Transformations Node
Overview
The Transformations Node in Noca AI is a logic-type node that lets you reshape and standardize data as it moves through your flow. It comes with a variety of built-in operations, including:
- Data Switch → Switch Values
- Array → Join
- Date & Time Format → Format Date
- Number Format → Format Integer
- …and more
Why & When to Use It
Whenever you connect two systems, you’ll encounter differences in formats, field names, or value conventions. Left unaddressed, these mismatches can lead to errors, duplicate records, or data loss. The Transformations Node lets you:
- Normalize formats (e.g. convert dates, adjust number precision)
- Remap values so both systems speak the same “language” (e.g. lowercase → UPPERCASE)
- Combine or split arrays to match the target schema
Example:
Imagine System A stores employee statuses as lowercase strings (“active”, “on hold”, “terminated”) while System B requires them in uppercase. You can insert a Switch Values step to transform:
“active” → “ACTIVE”
“on hold” → “ON HOLD”
“terminated”→ “TERMINATED”
before sending the data on, ensuring both systems stay perfectly in sync.
How to Use the Transformations Node
Step-by-Step Instructions
In the flow builder, click the “+” button to open the Add Node modal.
Go to the Logic tab or search for “Transformations” in the search box.
Select the Transformations node and click “Insert”.
![]()
Once added to the canvas, the Properties Panel will open automatically:
- The Transformations category will be collapsed.
- A “+ Functions” button will be there to add

Configuring functions
Click on the “+ Functions” button, which will open a tree structured lookup.
Either search for a specific transformation or collapse the desired category to see the options below it and then select your choice.
Once you click on the transformation it will be selected and a collapsible accordion item will be added to the properties panel with the name of the transformation option you chose.
Clicking on the “+ functions” again will allow you to add more transformations.
Using the Transformation in Other Nodes
To reference transformations in a later step:
1- Add a new node after the transformations node
When Mapping this node, Go to the Data Kit > Nodes Tab > Transformations Node > App fields
You will see the transformations you previously created.
Choose your preferred transformation and drag it into the relevant configuration input.
Then insert the node.
Example: Creating a “switch values” transformation and using it to create an Item in Monday task board
Let’s walk through a real-world example where we:
Fetch 5 Account records from Salesforce
Create a transformation item to switch values
Send the data after transformation to Monday.com Task Board..
Steps:
Create a new flow
Add a Manual Trigger node
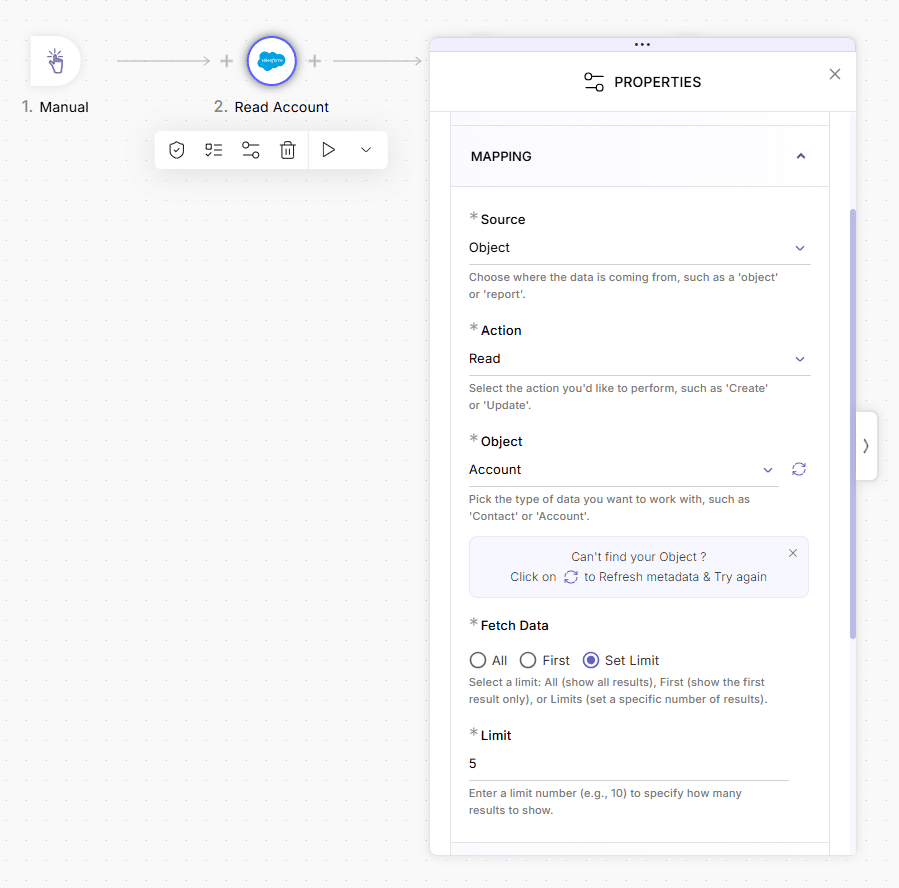
Click “+” to the right of the trigger to add a Salesforce node
In the Salesforce node:
- Select your connection
- Source: Object
- Action: Read
- Object: Account
Once added, configure:
- Under Fetch Data, choose Set Limit
- Set the limit to 5

Click “+” to the right of the Salesforce node, then add a Transformations node
![]()
In the Transformations node’s properties:
- click the functions button
- Search for “Switch values” in the search box or collapse the “data switch” option and select the switch values option under it.

- A new accordion item will be added in your properties panel, collapsed.
- The header of this item will inherit the name: switch values.
- Value: you will need to specify in which field you would like to use this transformation

- Go to data kit > nodes tab > 2. Read account > App fields > Active
- Drag the Active field into the value input.

- Click on “Add transformation to set the original value and the new value:
In value (original value) : Yes
Out Value (the change you want made): Active

Click “+” to the right of the Transformations node, and add a Monday.com node:
- Choose your Monday connection

- Source: Items
- Board: Tasks
- Action: Create
- Click on the insert button.

- The node will be added on canvas and its properties panel open beside it.
- In the properties: Click on “Add fields” button and turn the “Name” checkbox in the fields list.
A “Name” input will be added to the properties

- Go to Data Kit > Nodes Tab > 3. Transformations > App Fields > Switch Values
- Drag the Switch Values field into the Name input
