Exporting Flows
Flows in Noca AI are designed to be flexible and portable. Whether you’re moving flows across environments, between accounts, or backing them up externally, the export feature makes it seamless.
Watch & Learn
Where to Export From
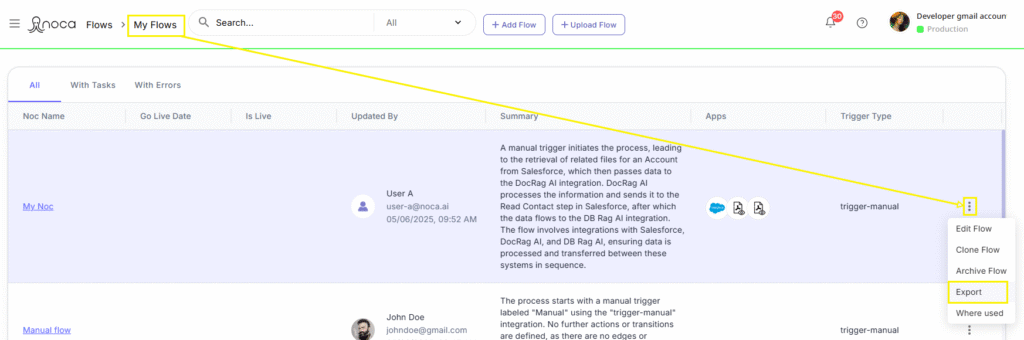
You can export a flow from two locations:
- My Flows Page: In the table, click the kebab menu (⋮) on a flow row and select Export.

- Flow Builder: From the header actions menu (⋮) in the Flow Builder, choose Export.

Both paths open a multi-step Export Wizard.
Export Options
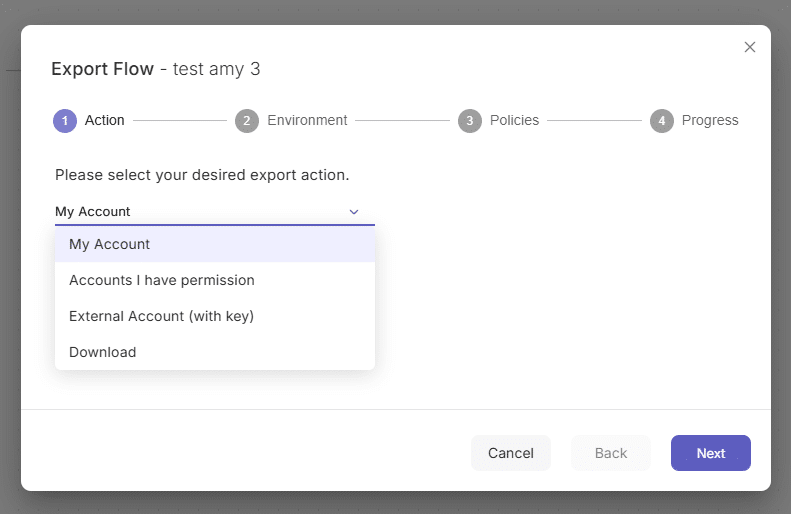
In the first step of the wizard, you will need to select one of the following export options:
My Account
Export a flow between environments within your own account
Accounts I Have Permission
Export a flow to another Noca AI account you have access to
External Account (with Key)
Export a flow to an external account using a share key
Download
Download a .noc file of the flow to your device which can later be uploaded.
Option 1 – Exporting to: My Account
Step-by-Step
Select Export Action
Choose “My Account” as the export destination
Select Target Environment
- Choose the environment you want to export the flow to
- The dropdown will not include the environment you’re currently in
Map Connections (Optional)
- You’ll see a list of apps/services used in the flow
- For each, you’ll see:
- App logo and name
- Current connection in the source environment
- Select the corresponding connection available in the destination environment
🛈 This step is optional. If you don’t choose connections, the recipient will need to configure them manually later.
Include Policies (Optional)
- If your environment uses policies that restrict certain flow behaviors or integrations, they will be listed here
- You can choose to export them along with the flow by checking the relevant boxes
- Use the “View Details” link to inspect any listed policy
🔒 Learn more about how Policies work
Final Export
- Click “Export” at the bottom of the wizard to complete the process
- The flow will now be available in the destination environment
⚠️ Re-exporting the Same Flow? If the flow already exists in the destination environment:
- You’ll see a toggle: “Create as new flow”
- Off (default): Updates the existing flow
- On: Creates a new flow copy (not recommended for versioning)
Option 2 – Exporting to: Accounts I Have Permission
Step-by-Step
Select Export Action
- Choose “Accounts I Have Permission” as the export destination
Select Target Account & Environment
- Choose the account you want to export to (from a dropdown of accounts you have access to)
- Then choose the environment within that account
Map Connections (Optional)
- You’ll see a list of the apps/services used in the flow
- Each entry will include:
- App logo and name
- Name of the connection currently used
- You can then choose a corresponding connection from the destination account
🛈 This step is optional. If left blank, the recipient will need to configure these connections after the flow is imported.
Include Policies (Optional)
- Same as in previous action: you can choose which policies to export along with the flow
- Use the “View Details” link for more info about each policy
Final Export
⚠️ If this flow already exists in the destination environment, you’ll see the “Create as new flow” toggle — allowing you to overwrite or duplicate the flow
Option 3 – Exporting to External Account (with Key)
This export method allows you to send a flow to an account without having to have direct access to it, using a unique Export Access Key. The recipient (destination account owner) must provide you with this key beforehand.
How to Get the Key
The key can be generated by the destination account owner:
Go to Security & Credentials in the left drawer menu
Select Export Access
Copy the provided key and share it with you securely
Step-by-Step Instructions:
Select Export Action
Choose “External Account (with Key)” from the list of export options.
Paste the Export Key
- Enter the key provided to you in the input field.
- Click “Validate”.
- Once the key is verified, you’ll see a confirmation message under the field like:
Export Policies (Optional)
- If the current environment has policies (such as app or connection usage limits), you can choose to include them in the export.
- Select any policies to include using the checkboxes. Click “View Details” to review them.
Confirm and Export
Click “Export” to complete the process.
If this flow already exists in the destination environment, you’ll see the “Create as new flow” toggle — allowing you to overwrite or duplicate the flow
Option 4 – Downloading as file
This option allows you to download a copy of your flow as a .noc file to your device.
Step-by-Step:
Select Export Action
- Choose “Download” from the list of export options.
Once selected, the flow will immediately download as a file to your computer — no additional steps are needed.
📁 You can later upload this .noc file into any Noca AI account using the Upload FlowMy Flows page.